Summary
Continuing Care and Recall are both features that allow you to reach your patients who are in need of a regular, return visit. You may refer to these return visits as recall or recare.
Some practice management systems (PMS’s) have the ability to track patients who are eligible for recall/recare by assigning providers and appointment types with a specific time period for the next recall appointment.
If this feature isn’t available in your PMS or you have chosen not to use the feature, then Continuing Care is for you.
Note: We do not recommend using both the Continuing Care and Recall feature simultaneously in Patient Communicator.
When using Continuing Care, you will identify the recall/recare providers and appointment types in the notification setup and determine when the notification will be sent to your patient.
A message will never be sent to a patient that has a future scheduled appointment of the type you’ve selected in the notification, ensuring that a patient will only receive a reminder when there is a need to schedule a future recall appointment.
Note: When creating and enabling a Continuing Care notification, all of the following steps must be completed: Not setting or incompletely setting any step below may prevent messages from being delivered to your patients. Remember to name and set the preferred delivery day and time if different than the default settings.
You can recognize a Continuing Care reminder in the Timeline view by their blue color.
 Continuing Care Notification
In the example above, a notification is being sent to patients whose last Routine Check Up appointment was 5 months ago.
Create & Enable a Continuing Care Notification
1. Message delivery method: Choose any combination of Email, SMS, or Voice by toggling the buttons to the ON (green) position.
 Message Delivery Toggles
2. Enable: Turn on the notification by toggling the button ON (green).
 Enabled Toggle
3. When to send notification: Each notification allows you to determine the "triggers" for the notification to be delivered. Patient Communicator will look for last time your patient had an appointment type selected in the Appointment Type field of the notification and send the notification at the time you enter here.
We will check our PMS every day to see which patients fall into this time frame for that day and message any patient who does not have a future Routine Check Up Appointment.
 Continuing Care Edit Screen
In the example above, a notification is being sent to patients whose last Routine Check Up appointment was 5 months ago. We will check our PMS every day to see which patients fall into this time frame for that day and message any patient who does not have a future Routine Check Up appointment
4. Send at: The time of day the notification is to be sent.
 Send Time
5. Providers: The provider associated with a patient’s appointment must be present. If a provider used for appointment scheduling is not present in the drop down menu, try refreshing providers, return and refresh the notification, and enable the desired provider. Settings > General Settings > Refresh PMS Data.
 Select Provider Field
6. Appointment Types: The appointment type associated with a patient’s recall appointment must be present. If an appointment type used for an appointment is not present in the drop down menu, try refreshing appointment types, return and refresh the notification, and enable the the desired appointment type. Settings > General Settings > Refresh PMS Data.
 Select Appointment Type
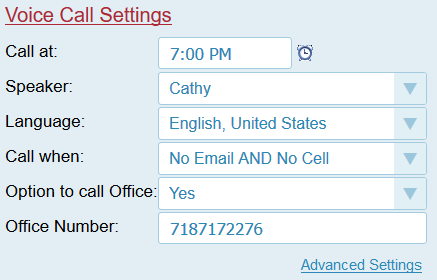
7. Voice: Continuing Care notifications have the option to deliver a voice message to the patient’s home phone. We recommend using the voice feature to your patients with no email or cell phone contact information to ensure that your recall message is delivered. To enable an automated voice call update the settings below:
Call at: Set the time of day to make the call
Speaker: English is always default. You may choose Spanish, Mexico for a voice message in Spanish if Alice is chosen as Speaker. Choosing Spanish, Spain enables Conchita.
Language: English is always default. You may choose Spanish, Mexico for a voice message in Spanish if Alice is chosen as Speaker
Call when: Choose what contact information (or lack of) triggers a call
Option to call Office: Will the patient be able to press a button to call the office telephone.
 Voice Call Settings
Office Number: Displays what phone number the patient will reach when Option to call Office is enabled
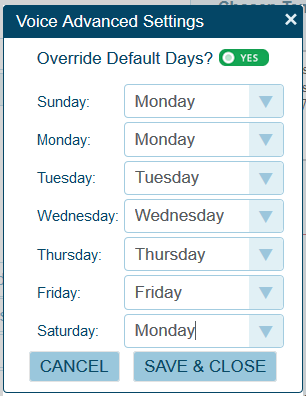
Advanced Settings: A practice may decide to send a voice call recall on a day other than scheduled. In the example below, the voice reminder call scheduled for Saturday and Sunday (left column) have been changed to the following Monday (right column).
 Voice Advanced Settings


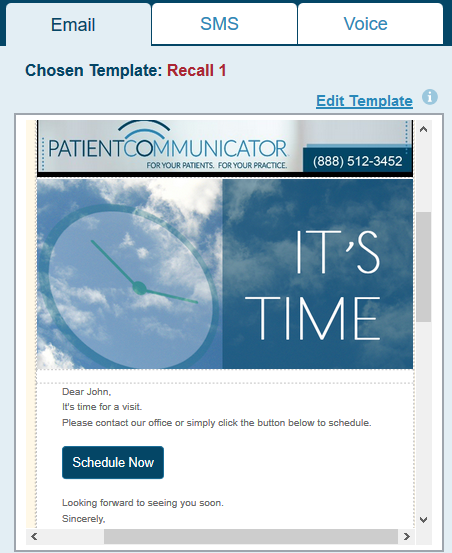
8. Templates: Each notification will preload with a default template when the message delivery method is turned on.
To view the current enable template, click the template tab in the notification for enabled delivery method. To change or edit the current template, click Edit Template.
 View/Edit Template
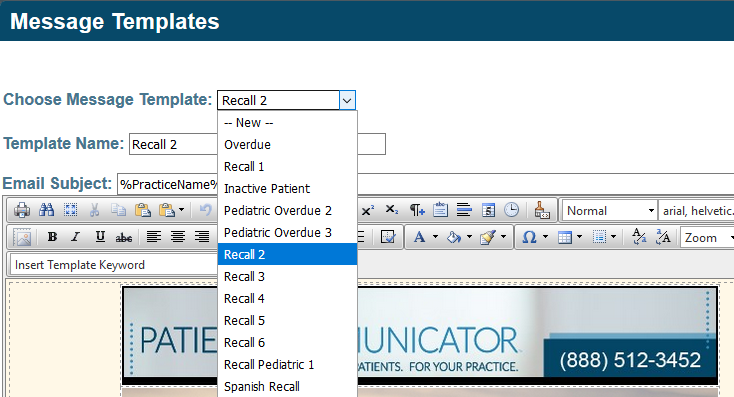
To change templates, choose a different template from the drop down menu in the Message Template screen. When done, click SAVE & CLOSE
 Message Templates


After completing steps 1-8 above, the notification is enabled and will be automated on the next calendar day.
To edit or create new templates, see articles for Email & SMS Templates or Voice Templates.
<End of Article>
